Stamping Submittal Attachments
Onware has a built in Stamp feature that is available for PDF attachments uploaded to Submittals.
Tip: Stamps are configured per Company, a user must be associated with a Company in Onware to use the stamp feature.
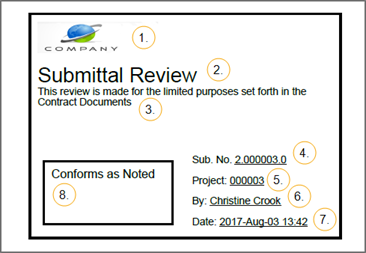
Stamps applied in Onware can be configured to contain:
- A company logo *
- Stamp Header Text *
- Disclaimer Text *
- The Submittal Number
- The Project number
- The person who applied the stamp
- The date selected in the Submittal Record
- The action taken selected on the Stamp page.
* Items that must be configured by a Software Administrator
Note: Stamps must be configured by Software Administrators. Contact your Project Administrator or the Onware Help Desk for assistance.
To apply a stamp to a Submittal Attachment:
- Required: Select the Date in the Actions section of the Submittal record and click
 .
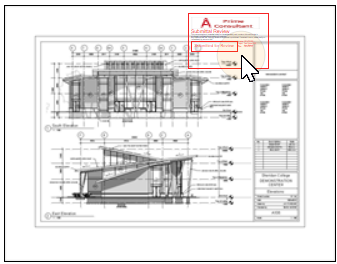
. - Locate the document you would like to apply a stamp to.

Note: Stamps can only be applied to PDFs uploaded as attachments to a Submittal. For more information on adding attachments to a Submittal, see Send a Submittal History
- Select the Stamp link.

The Stamp page will display.

- Select which stamp you would like to apply to the drawing.
- Select the size of the stamp you would like to apply.
- Select a page to apply the stamp too, or apply the stamp to all pages
- Select the action you would like to appear on the stamp.
- On the thumbnail preview of the attachment, use your cursor to position the stamp on the PDF thumbnail.
-
Once the stamp is in the correct position on the thumbnail, select the
 action button.
A confirmation message is displayed when a stamp has been applied successfully.

-
If you would like to apply additional stamps, select a different page or action and repeat the steps above.
Once you have completed applying stamps to the document, select back in your browser to return to the Submittal.


