Building Blocks of Onware
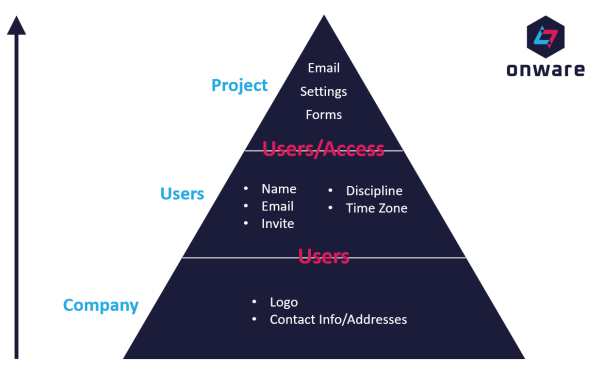
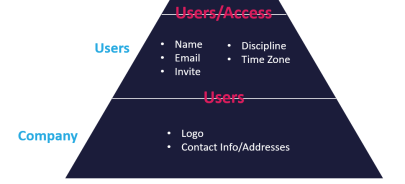
Using construction metaphors, the project set-up in Onware can be thought of similar to building a structure. If the foundation of the structure is not solid or is cracked, the integrity of the structure may be comprised. Each section of Onware’s project set-up (Company, User and Project) builds upon the foundation of the previous section. Understanding the importance of the building blocks of Onware is equally important as the step-by-step instructions on how to set-up a Project. The Set-Up a Project is based on this building block principle.
A construction project (as a very simple interpretation) is a pre-defined scope of: what is to be built; its duration; its cost; and the Companies specified to complete the project. The Companies and Users are the “foundation” of the project team, collaborating together to complete the project.
Companies and Users
Likewise, Companies and Users are also the “foundation” in Onware, as they are global to your Onware site. Metaphorically, think of them as an address book shared across the site.
Each User and Company represents a single Onware account which can be re-used from project to project, as required. Users are the individuals who create and collaborate on project documents, doing so on behalf of the Company they represent.
Administrators create Users and Companies in addition to designating the association between the two. Designating the User-Company association provides Onware the ability to document the Company details, such as Company name, logo, and address when a User collaborates on a project document.
Caution: If the Company-User association is not defined, this may impact the detail displaying on the project’s printed documents, such as Company name, logo and/or address.
Project
![]()
The project is the final building block of Onware. Simply put, it is a collection of Users and its pre-defined scope. Administrators create the project space, incorporating the pre-defined scope requirements and Users to its space.
Assigning Users to the project provides the Users access to the projects documents, allowing them to collaborate with the documents within the space and other project Users.
Onware provides the flexibility to configure each project individually without impacting other projects. The pre-defined scope outlines the needs of the project, which can be facilitated in Onware through one or more of the segments below. Each segment provides a specific function and may or may not be required for your project.
Project Segments:
-
Edit a Project Details:
-
Documents the details of the project, such as number, Title, location. This information will provide users with these details when accessing the project from the Home page, its documents and will also be included in E-mails sent from Onware.
-
Activate your project: By default, when a new project is created in Onware, it is inaccessible to anyone in Onware except Administrators. This ensures the project set-up can be completed prior to any User(s) accessing it. Activating the project allows the project to be accessible to the Users via the project drop down list on the Home page. For more information, see Activate a Project.
-
-
-
Add User(s) to the project. This allows the User to see and select the project from the Home page project drop down list.
-
Customize the User’s access specific for your project, if required. This allows the User to have a customized Access group, and/or Discipline, for your specific project only.
-
-
Configure E-mail Subscriptions : Assigns User(s) to receive an E-mail when a document’s status changes on the project. E-mail Subscriptions e-mails contain attachments and links to the documents and do not provide Users the ability to Action the document.
-
Manage Distribution Groups: Distribution lists allow you to select a pre-selected group of users to include as project participant on certain documents.
-
Configure Printed Forms: Defines which templates will be used on the project, changing the layout of your project's printed documents. All projects default to the out-of-the-box template called “Standard”. Templates can be customized for each type of document (for example, an RFI or a Change). If your Onware site has customized templates/printed forms, Configure Printed Forms allows you to define which template to use for which document(s) on the project.
-
Contracts: Contracts are used to manage the Construction Contract Value of a project. The majority of Onware documents allow a User to select a Contract from a drop down menu. For documents which alter the Construction Contract Value, the Contract selection is mandatory field as this provides Onware information to complete automated calculations (such as calculating the “Revised Contract Value”).
Caution: It is strongly recommended that the Contract Value be inputted into Onware prior to the project being activated. The Contract’s Value is used in automatic mathematical calculations detailing how the Contract dollar value changes over time (commonly referred to as the “Revised Contract Value”). If the Contract Value has not been entered into Onware and Change Orders or Progress Claims are created, these calculations will be incorrect.
-
Settings: Settings allow customization of many Onware document fields, functions and workflow as required for your project. There are over 200 settings in Onware!
-
User Directory Account: Activate your users and Send invitations: For members of your project team that are also Existing Onware Users, if they have already logged into Onware, they will have access to your project as soon as the project is Activated. However, for new Users, user accounts which had to be created for your project, these Users must create a secure password prior to accessing Onware and your project. This is completed through an invitation process, which triggers Onware to send an E-mail to the User inviting them to use Onware for your project. For more information, please see Log In & Password.
Review the Project Set-Up Checklist


