Set-Up a Project
Once you have gathered all the necessary information to set up your project in Onware, follow the Set-Up steps below to put all the together to complete your project set-up!
For more information on our recommendations of information to be gathered prior to setting up a project in Onware, please see .
Set-Up Step 1: Companies and Users
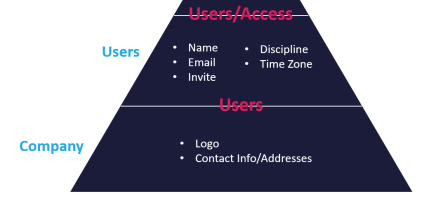
As Users are representatives of a Company, we recommend starting project set-up at the Company, the “foundational” layer of Building Blocks of Onware. This aids in ensuring your project set-up is based on a solid foundation.
Caution: Duplicating users and companies can have significant impacts on projects and the users experience. We strongly recommend searching for the Company to verify if a Company record already exists before creating a new account. For more information, please see Search for a Company .
Tip: If an organization as multiple locations, each location should be created as a separate Company.
-
Verify if the Company exists in Onware . For more information, please see Search for a Company .
- If the Company record exists:
- Verify the Company information. If the Company information needs to be amended, please see Edit a Company.
- Access the Contacts section of the Company record to verify if the Users for your project already exist. For more information, please see Contacts.
- If the Users display in the Contacts section, Edit the existing User verify if any amendments are required to their User account. For more information, please see Edit Existing User(s) from Company Directory
- If the User does not display in the Contacts section, this is one of two reasons:
- The User has an account in Onware, but has not been associated to the Company. Use the steps in Add an Existing User to a Company to verify if the User has an account and associate it to the current Company. It is recommended to edit the existing User to verify if any amendments are required to their User account. For more information, please see Edit Existing User(s) from Company Directory.
- If no results appear from Add an Existing User to a Company, this implies the User does not yet have an account in Onware. Use Create and Add a New User to a Company or Copy an Existing User to create a new User.
The User does not have an account in Onware. There are two ways to create a new User and associate the User to the Company.
Create a new User from scratch. For more information, please see Create and Add a New User to a Company.
Use Copy User functionality to quickly copy an Existing User’s account information to a new User account. For more information, please see Copy an Existing User.
- The User has an account in Onware, but has not been associated to the Company. Use the steps in Add an Existing User to a Company to verify if the User has an account and associate it to the current Company. It is recommended to edit the existing User to verify if any amendments are required to their User account. For more information, please see Edit Existing User(s) from Company Directory.
- If the Company record does not exist:
- Create the Company and the User Accounts. For more information, please see Create a Company.
Set-Up Step 2: Project
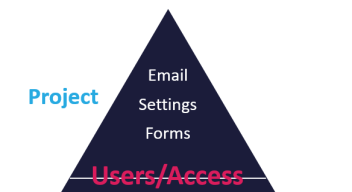
Once the foundational building blocks of Users and the Companies have been verified and/or created as required, the next step is to create, configure and invite your project team to your project.
Before creating your new project, we encourage you to review the to gather all necessary information to configure your project.
Tip: Is there an existing project that is identical, or near identical, to the new one? If so, please see Copy a Project to verify if this option is a faster way to create your new project. Copy a Project allows the flexibility to choose which “pieces” of the project to be copied into the new project.
Note: For additional insight into the project’s segments, please see Building Blocks of Onware.
-
Verify if the Project exists in Onware . For more information, please see Search for a Project.
-
If the Project exists:
-
Verify the Project information. If the Project information needs to be amended, please see Edit a Project.
-
Is there additional configuration required? If so, please see for suggestions on areas which may require further customization.
-
-
If the Project does not exist:
-
Create the Project. For more information, please seeCreate a Project.
-
Add the project details. For more information, see Edit a Project.
-
Add Users. For more information, see Manage Users on a Project.
-
Customize User Access and/or Discipline, if required. For more information, see Customize User's Per Project Access.
-
-
Add E-mail Subscriptions, if required. For more information, see Configure E-mail Subscriptions .
-
Add Distribution Groups, if required. For more information, see Manage Distribution Groups.
-
Set the template(s) to be used on the project, if required. For more information, see Configure Printed Forms.
-
Input the Contract details. For more information, see Contracts.
-
Customize your project further, as required. For more information, see Settings.
-
Activate the Project. For more information, please see Activate a Project.
-
Send Invitations to new Users. For more information, please see Log In & Password.
-
-
-
Additional reference information:
-
For steps on everything to do with companies, please see Company Directory.
-
For steps on everything to do with Users, please see User Directory.
-
For steps on everything to do with your project, please see Project Directory.
-
For steps on everything to do with Contract, please see Contracts.
-
For steps and all information on Settings, please see Settings.
-
For steps on how to create and/or customize printed forms, see Custom Printed Form / Report.
-
For more information on Integrations, please see:
-
Bluebeam Studio Prime: Connect Bluebeam Studio Prime Account
-


