Issue a Site Visit
A Site Visit can be issued by a Contract Administrator, Consultant, or General Contractor Project Manager.
To issue a Site Visit:
- On the Home page, Select a Project on which to issue a Site Visit.
The Project details appear on the Home page.
- From the Construction menu, select Site Visit.
The Site Visit Search page displays.

- Click
 .
.
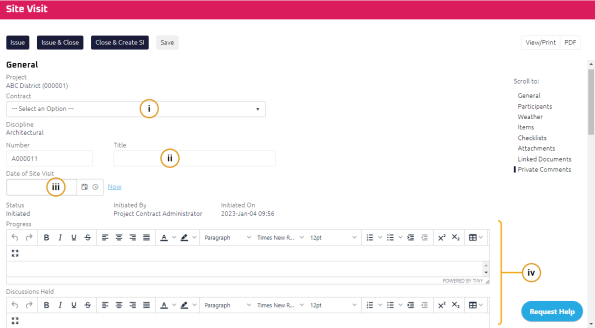
The Site Visit Edit page displays.
- Complete the necessary fields:
Note: If you're a Consultant issuing a Site Visit, you will see ![]() and
and ![]() action buttons at the top of the Site Visit Edit page.
action buttons at the top of the Site Visit Edit page.
- Select the Contract.
Note: The Site Visit number is populated in sequence based on the Consultant or Contract Administrator's discipline, or when created by a General Contractor Project Manager, the project.
- Enter the Title.
- Using the Date Picker, select the Date of the Site Visit.
- Using the Rich Text Editor:
- Enter the Progress details of the Site Visit.
- Enter Discussions Held during the Site Visit.
- To add site visit participants, perform one of the following:
- Create New User
- Browse for Project Users
- Search for a User using the Start Typing to Search feature
Tip: You can delete an person from the site visit participant list by clicking the Delete link next to the person you want to remove.
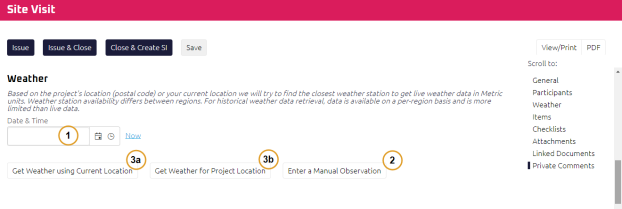
If you need to record the weather information on the date of the Site Visit:
- Using the Date Picker, select the Date & Time of the Site Visit.
Note: To record today’s date an current time, click the Now link.
-
Click
 .
.
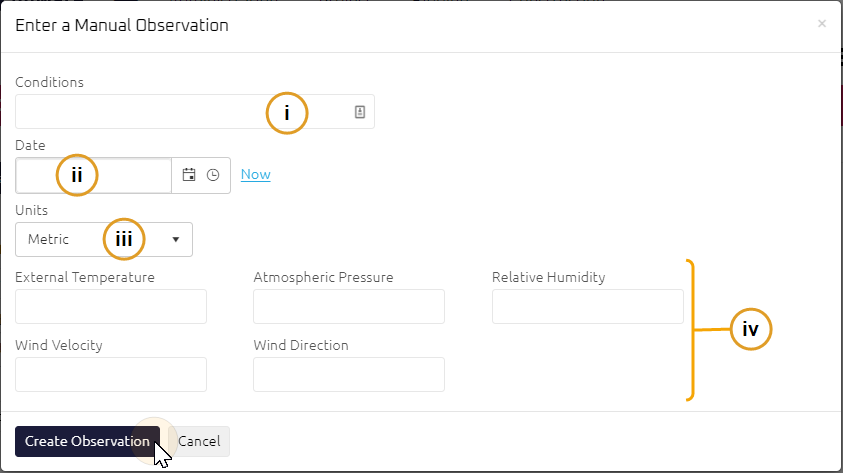
The Enter a Manual Observation window appears.
-
Enter the necessary fields:
 Manual Observation
- Enter the weather Conditions.
- Using the Date Picker, select the Date of the visit.
- Select the Units of measure.
- Enter the:
- Click
 to record the information entered.
The recorded, manual weather observation appears.
Get Onware to retrieve historical weather data:
- To receive weather for the project location, click
 .
.
The weather information for the project location appears.
- To receive weather for your current location, click
 .
.
The weather information for the current location appears.
Tip: You can delete an entry by clicking the ![]() next to the entry you want to remove.
next to the entry you want to remove.
Document any Site Visit items by selecting:

- If you want to add a new item to the site visit , click
 .
.
The Edit Item form to expand shows.
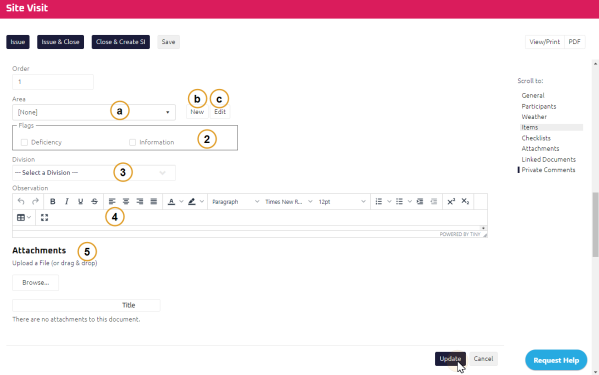
- Fill out the necessary fields:
- Select one of the following:
- Select applicable category in Flags.
- Select a Division.
- Enter your Observation.
- Add Attachments if needed.
-
Click

- The Item is added to the Items section.
- If you want to import an item to the site visit , click
 .
.
The Import Items window appears.
- Select the applicable Discipline(s) you want to search within.
- Click
 .
. - Select the check box(es) next to the existing Items you want to import.
- Click
 .
.
The Imported Item has been added to the Items section.
If you want to attached a checklist to the Site Visit:

- Using the Start Typing to Search, enter the checklist title or number.
- Select the checklist you want to add to the Site Visit.
- Click
 .
.
The checklist appears under the Checklists section and has been added to the Site Visit.
- To edit a specific checklist item, click Edit next to the item.
The Action field appears.
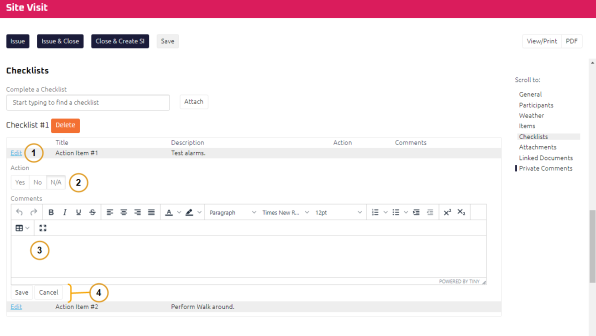
- Select the Action taken on this checklist item.
-
Using the Rich Text Editor, Enter any Comments on the checklist item.
-
Select one of the following:
-
To save any changes made to the checklist item and close the Action field, click
 .
. -
To not save changes made and close the Action field, click
 .
.
-
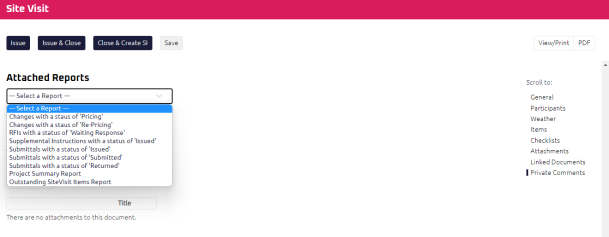
The Attached Reports section allows you to add documents to a Site Visit. The feature is a quick way to generate a point in time report based on a document status.
To attach a report:
- Click the Select a Report drop-down.
- Select the status of the document you want to attach.
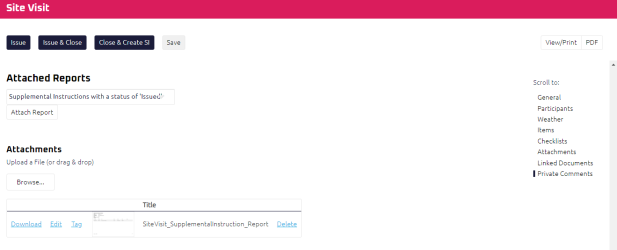
- Click
 .
.
The report appears in the Attachments section.
The Attach Seal section allows you to upload your seal to a Site Visit report, if required.
To attach a seal:
- In the Attach Seal section, click browse.

The File Upload window displays.
-
Select the file you want to use as your seal and click Open.
The seal is uploaded and a thumbnail preview of the seal will display.

Tip: You can also drag & drop the file from your computer to the Attach Seal section.
Note: Custom Printed Form must be used to display the seal on printed Site Visit document.
- Complete any additional fields:
- To action the Site Visit, select one of the action buttons from the top toolbar:
Contract Administrator to review and close the Site Visit. For more information, see Review and Close a Site Visit
A confirmation page affirming all required information is completed and the document has successfully transitioned to the identified status.
Any e-mails required to be sent for this document (Action Item notification or E-mail Subscription e-mails) are queued.
-
 the Site Visit to close the, if no further action is required. (General Contractor Project Manager and Contract Administrator role). For more information, see Issue & Close a Site Visit.
A confirmation page affirming all required information is completed and the document has successfully transitioned to the identified status.
Any e-mails required to be sent for this document (Action Item notification or E-mail Subscription e-mails) are queued.
-
 to close the Site Visit and create a new Supplemental Instruction (Contract Administrator role). For more information, see Issue a Supplemental Instruction (SI).
The Site Visit has been closed and the Supplemental Instruction Edit page displays.
Any e-mails required to be sent for this document (Action Item notification or E-mail Subscription e-mails) are queued.
-
 the Site Visit to issue or edit later. For more information, see Save a Document.
